
Demystifying Glaucoma Testing
Julia Walker at Tauranga’s 2024 ‘LOVE your eyes’ public symposium
The Glaucoma NZ ‘LOVE your eyes’ Tauranga public symposium attracted around 70 attendees. Optometrist Julia Walker presented on six tests that detect and monitor glaucoma. Her guidance means you don’t need to be intimidated by your regular check up.
First off, Julia describes Tonometry (measuring eye pressure, also known as intraocular pressure or IOP).
Julia explains “there’s not one particular pressure level at which you get glaucoma – it depends on how vulnerable your optic nerve is to pressure.” Eye pressure is measured in millimetres (mm) of mercury (Hg), which is a unit of pressure commonly used in medicine. The average eye pressure is 15 to 16 mm of Hg. Eye pressure can vary slightly over the course of the day.
- iCare Tonometry: This portable handheld device uses a small lightweight probe. The probe makes brief contact with the cornea, the outermost clear layer of your eye. “You might feel a light touch on the eye, but it doesn’t cause any discomfort,” she notes.
- Goldmann Tonometry: In this method, eye drops (which may sting a little…) are used to numb the eyes. “A small probe attached to a slit lamp touches the cornea to measure the pressure. It’s very accurate, and you won’t feel anything once your eye is numbed” she assures.
- Non-Contact Tonometry (Air Puff): It’s a puff of air. Julia says “this quick air puff is painless although it has been known to give a few people a fright!“
Measuring your eye pressure on a regular basis shows whether your treatment is working. If it’s not controlling your eye pressure, your treatment may need adjusting. Julia adds “use your glaucoma drops as usual before you come in for your appointment.” She explained that this was to get an accurate measure of your eye pressure in its treated state.
Second up: Central Corneal Thickness Measurement.
“Early on, you will have your central corneal thickness measured” Julia explains. This is a simple painless test which can be done using a range of different instruments. Most often it’s done with probe that makes brief contact with your cornea. It’s measured in a matter of seconds. “We use this measurement to finely adjust the accuracy of the eye pressure reading” says Julia. “Interestingly, a thin cornea has a higher risk of developing glaucoma.”
Third, Gonioscopy (checking the eye’s drainage angle)
Gonioscopy examines the drainage angle of the eye, which regulates the outflow of fluid. This is the angle between the cornea and the iris. A special lens is briefly placed on the eye, with the use of a numbing eyedrop. Julia mentions that “this lens, used with the slit lamp, helps us to visualise the drainage structures of the eye“. This determines whether the drainage angle is open or closed. “It’s essential for diagnosing and managing different forms of glaucoma” she adds.
Fourth, Optic Nerve Assessment
Assessing the optic nerve head for structural changes is another critical test. Julia says “We look for cupping, where the pale part in the middle of the optic nerve head gets larger.” She points to her presentation slide and explains that this indicates damage.
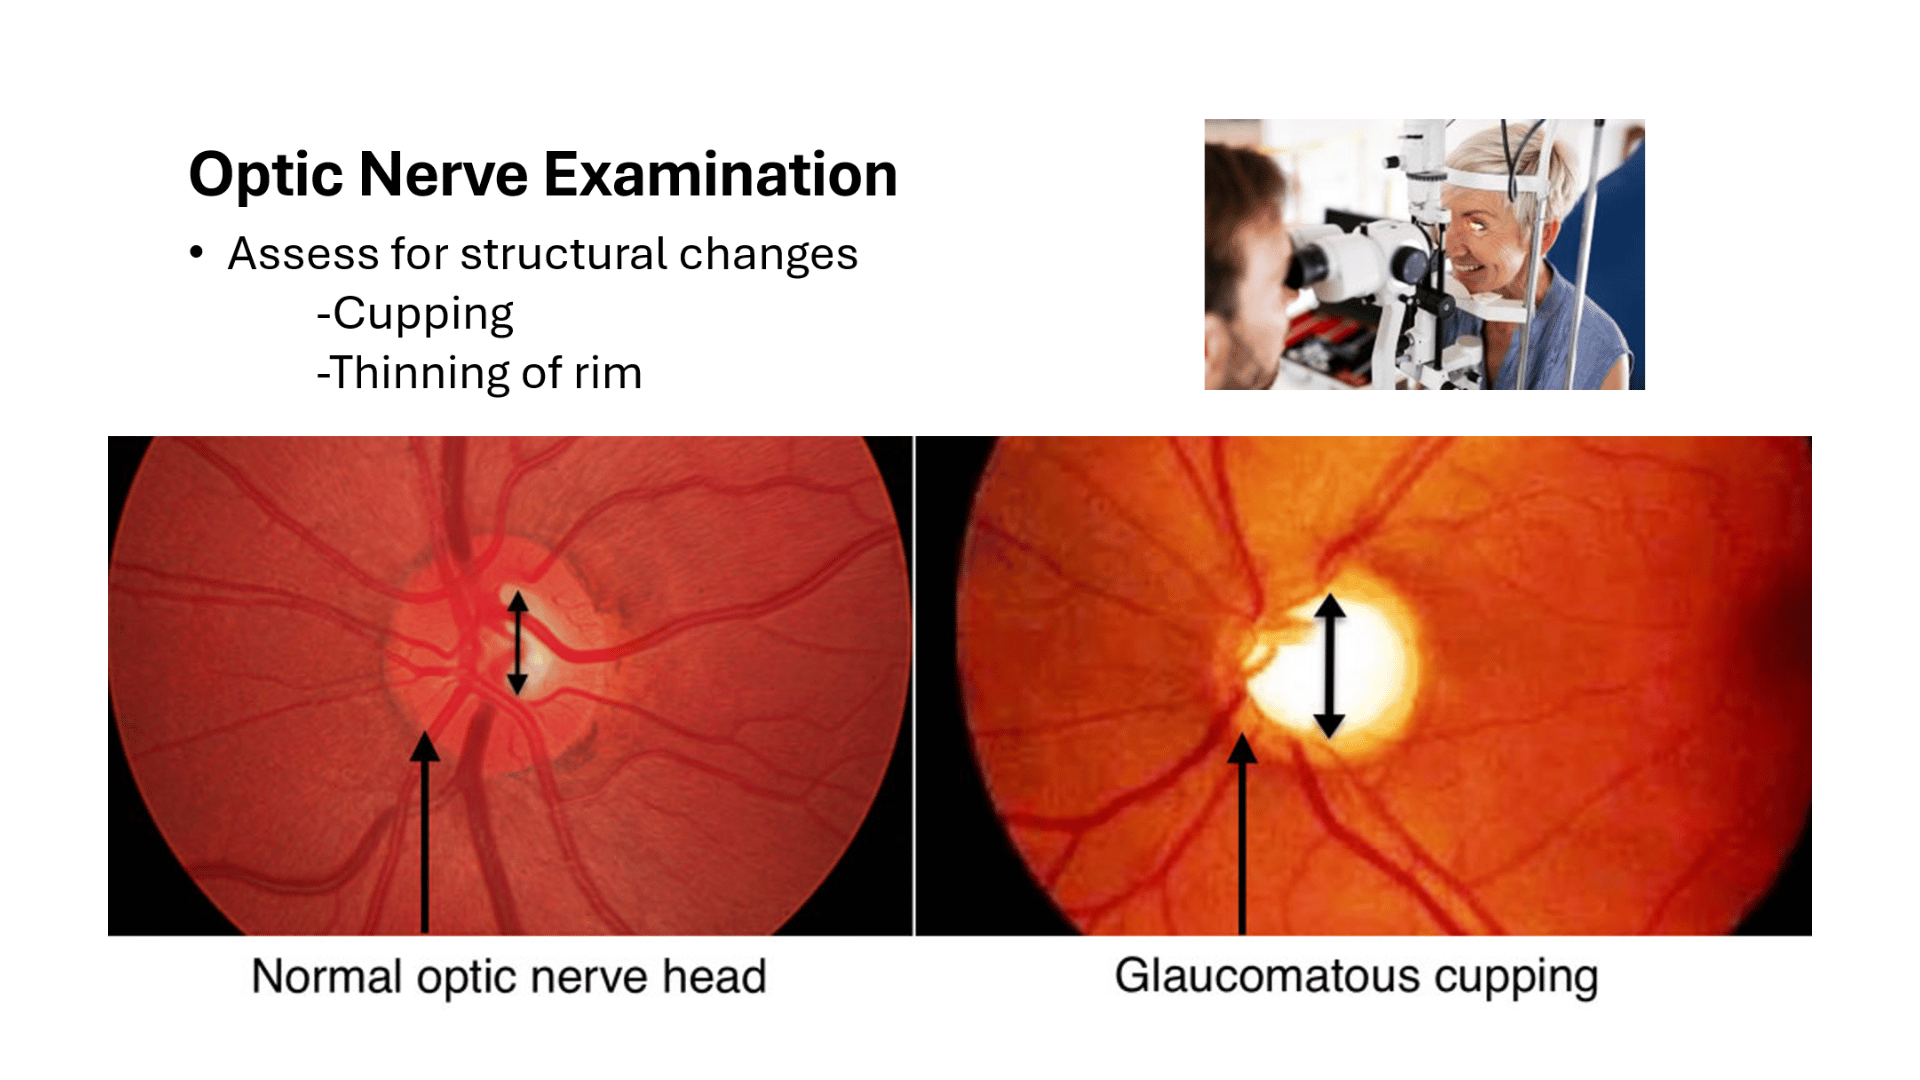
A table-top slit lamp (pictured) is used for this assessment. “We might also use dilating eye drops to enlarge the pupil for a clearer view,” she adds. Sometimes, photographs of the optic nerve are taken for documentation.
Julia points out that ‘cupping’ is one of the changes we see in glaucoma. “Nerve fibres in the outer rim have become damaged or lost, causing the centre of the nerve to look hollowed out.” Measuring cupping (called a C/D ratio) at each appointment can help diagnose and monitor glaucoma.
Fifth, Visual Field Tests
This is a test familiar to many in the room. It maps out peripheral vision. Julia explains it in detail, “during the test, there will be a small light or other target that you are told focus on. Make sure you keep looking at this target throughout the test.”
“You will be asked to a press a button to indicate when you see a small light or dot in your peripheral vision” says Julia. “These will be of varying intensity and in different locations in your visual field. The test takes around 3 to 6 minutes per eye.”
She confessed that it can feel like a tedious test. So, she gives advice “make sure to let the technician know if you don’t feel you are sitting in a comfortable position.” She adds “or if you have any questions about the test procedure.” The technician can pause the test if needed, and people should blink as usual throughout the test.
A visual field test can detect the pattern of vision loss and where it occurs in your visual field. This test will be repeated over time to monitor the progression of glaucoma.
Sixth and finally, Optical Coherence Tomography (OCT)
OCT uses light to take cross-sectional images of the optic nerve head. “It’s a quick, painless test that helps detect early signs of glaucoma”, says Julia. This technology allows health professionals to measure structural changes accurately. She says, “OCT can be used to guide treatment decisions.”
Understanding Your Diagnosis
Understanding your glaucoma diagnosis is key to managing your eye health. Julia emphasises how important it is to work closely with your optometrist or ophthalmologist. This is to develop an appropriate treatment plan together. “Adhering to your medication schedule and attending regular follow-up appointments are vital.”
Julia finishes with a strong message on the importance of regular testing. “Early detection and treatment are crucial for preserving vision and maintaining a good quality of life. Don’t hesitate to ask questions – we’re here to help you every step of the way.”
Julia Walker works at Tauranga Eye Specialists, in the public health system, seeing glaucoma patients. She is an optometrist who is qualified to independently treat glaucoma. She also sees paediatric patients at the eye specialists.
Want to understand your glaucoma diagnosis but don’t know where to start? One tip is to compile questions to ask your specialist and take them on a notepad to your next visit. For more information on what to expect at your Ophthalmologist appointment click here.